Take a look at the wizard below. This is available whether you choose Merge Working Copy or if you want to Merge a single file. My top tip is that you should almost always use Merge Working Copy, especially if you are working with ADF (Application Development Framework) as many of the XML metadata files for your application will have dependencies on Java files and ending up with missed or out of sync files on a merge of any sort can lead to problems.

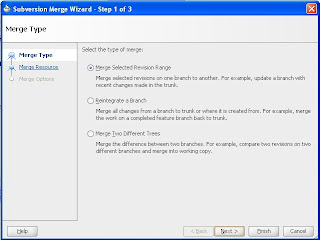
In previous releases we simply gave you the ability to enter your URLs and revisions, almost as you would if using the command line to access SVN. But in JDeveloper we pride ourselves on providing declarative help for developers. This wizard is invoked from a checked out application context - so you are always working within your working copy.
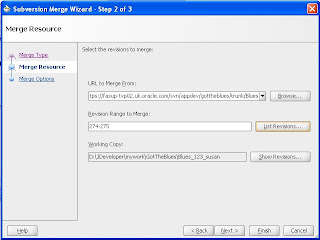
In this first step you choose the type of merge you are undertaking, for instance Merge Selected Revision Range is used if you want to update a branch with changes from the trunk. Let's take a common scenario: User 1 is working on Branch 123_susan. She knows that primarily her work will not cause any conflict with other work on other branches or the trunk so she has not worried too much about merging the latest trunk code into her branch. However, she comes across a problem and asks User 2 to fix something in the trunk so she can progress. She is told the revision that contains the specific fix she needs so she uses Merge Selected Revision Range to get that revision into her branch. The dialog below shows the path to trunk/blues as the source and her working copy - her branch - is the destination for the merge.

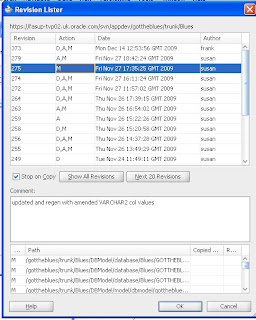
The revision to be merged - 275 - was picked using the List Revisions dialog. This dialog is used whenever revisions need to be browsed or selected. Notice that selecting 275 in the top panel shows the details of that revision - the comments, the files, the action and the author
 Now the user can complete move to step 3 of the wizard, choose other merge options and carry out a test merge to check her work and finally complete the merge of that one revision into her working copy. Finally, she will commit her working copy back to its branch on the repository as normal.
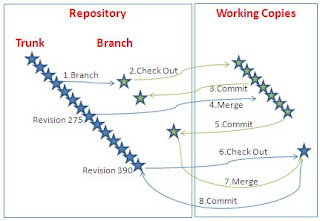
Once she has completed the work on her branch she will be ready to use the Re-integrate A Branch merge to get it back into the trunk of the development. As always, the way to do this is to carry out any merge into a local working copy and then commit. So the first step for the user is to do a final commit of her branch. At this stage she can remove her branched working copy as it is finished with. She checks out the latest trunk revision and now she is ready to merge her branch to her new (trunk) working copy. Let's look at that another way:
 1. A branch is created from trunk
2. User 1 checks out working copy from branch and edits code
3. Commits back to branch periodically
4. User 2 commits revision 200 to trunk and User 1 merges that revision to the working copy
5. Finishes coding working copy and commits to branch
6. Checks out new working copy from trunk
7. Merges branch into working copy
8. Commits working copy back to trunk
Before Subversion 1.5 the merge of a single revision in step 4 would have caused problems when the final merge of the branch back to the trunk was done (step 7). But SVN now has merge tracking so it keeps track of the revisions that have already been merged so that the final merge of all revisions goes ahead without error.
The third merge option is Merge Two Different Trees. This allows you to compare two different branches and merge and differences back into your working copy. This is the most complicated and, I would say, the least used of the merges.
One final tip - what if you want to revert your working copy to a specific revision? Use the Merge Selected Revision Range option. In List Revisions select the range of revisions from the latest to the revision you want to revert to and click OK. This will enter the range. But the range list will be ascending - eg 258-359. To revert to revision 258 simply reverse the range order and hey presto! a revert back rather than a merge up will be done - try it out in the test merge panel to check it - and you're done!
2 comments:
Do you have any idea of what sort of time frame there is for the release of "Team Documents"?
It is hoped that Team Document will be available in the next major release of TPC (with the next major release of JDeveloper).
What type of documents are you interested in seeing in this accordion? Contact me on susan.duncan@oracle.com
Post a Comment